Best Thing To Do When You Are Quarantined At Home
- Mar 21, 2020
- 6 min read
Updated: Nov 18, 2020
2020 hasn’t been great for most of us, I truly wish that everything will go back to normal as soon as possible. But in the meantime, since we are all social distancing ourselves, we need to make the most out of the situation and what’s better than learning something new!
Since August 2019, Instagram has opened for everyone in the world to make Augmented Reality (AR) filter on Instagram and also Facebook. AR filters allow anyone who uses it to change the colour of their surrounding instantaneously, place a 3D object on real-world, do a virtual makeup on your face and many more all through our smartphone! Learning how to make AR filter is easy and it can become a creative hobby or even a skill that can earn you money if you become good at it.
In this article, I am going to show you how you can quickly make a cool face filter with changing animation like the video below within 15 mins of installing the software called Spark AR!
Install Spark AR
Spark AR is a software made by Facebook especially to develop an AR filter on Instagram and Facebook. Spark AR can be downloaded through this link. Once download, just follow the instruction and log into your Facebook account the software. Yes, you need a Facebook account even if you only want to make a filter on Instagram, as Instagram is owned by Facebook and you would need your Facebook account to upload the AR filter later.
Launch Spark AR!
As of the time of writing (20th March 2020), Spark AR latest version is V84. Once launched, you will see the screen below.
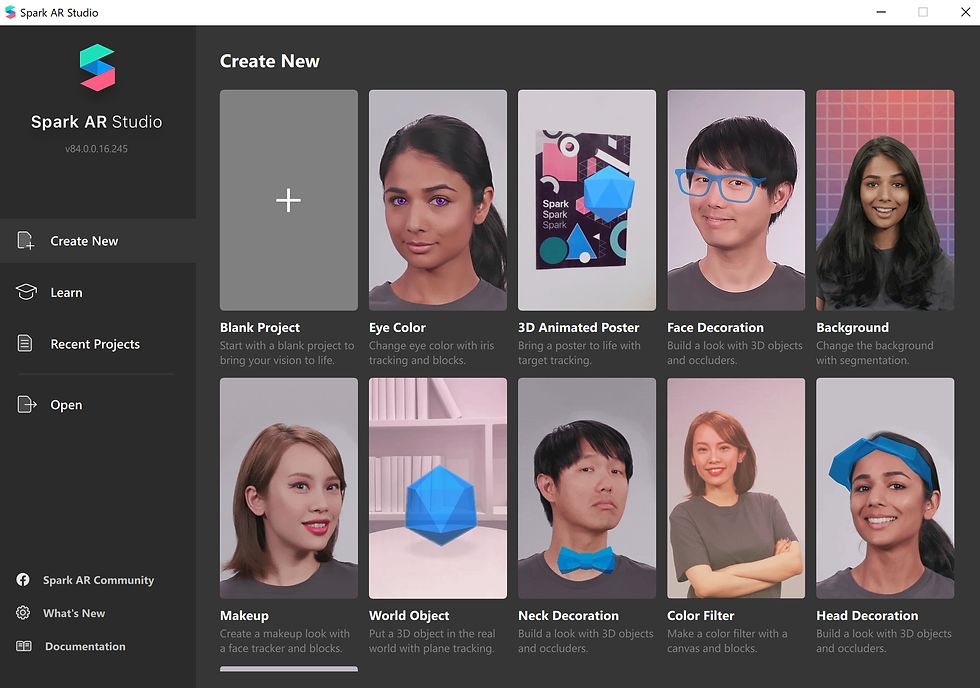
As you can see from the screenshot above, Spark AR has already prepared up to 9 different templates you can use with just a lick of a button, amazing right? These templates are useful even for experience creators to quickly kickstart their filter making process, you should definitely go play around with them. But the focus of the article is not the filter in the template, so let’s move on.

Click on Blank Project (Where the red rectangle above is) and start creating!
Let’s Start Creating!

This is the screen that you will see if you create a new project on Spark AR. The guy you see inside is part of the simulator where you can see how your filter looks like on a phone. You can change it to other videos (With other people of gender or races) which you prefer by clicking on the video camera symbol on the left-hand side, underneath file.

Step 1: Add a face tracker to the scene

The scene on Spark AR is where you can add different objects into the effects. For this article, we are going to need a face tracker, which you can add by clicking “Add Object” at the bottom of Scene. Alternatively, you can also right-click on camera to add any object you want.

Insert Face Tracker as seen above into the Scene.

Once added, you will see “faceTracker0” in your Scene, under Focal Distance, hooray!
Step 2: Add a Face Mesh under faceTracker0

Next, we will need to add a Face Mesh, which will be a child of faceTracker0 (It will go underneath faceTracker0 in the scene).
Similarly, click on “Add Object”, find Face Mesh and insert it into the scene. The Face Mesh will automatically be added under faceTracker0.

Once added, you will see faceMesh0 underneath faceTracker0, and the person in your simulator will have this black & white face mask over their face. The back and white face mask indicates that there is no material added onto the face mesh yet, and that is what we are going to do next.
Step 3: Add a material

For any object in Spark AR such as Face Mesh, you would need a material to set its colour, opacity, blend mode etc. For every material, you can also add a texture either by importing external images or using procedural textures created within Spark AR. We are going to use a procedural texture pre-created by me for this filter, which you can download and import in to use. But first, let us set the right setting for the material of the Face Mesh.

Select faceMesh0 and go to the right side where you can find the Inspector section. Click on the “+” sign on the right of Materials to create material0 as what you see above.

Now you will see that the face mask has turned white, indicating that a white material has been added to the face mesh. Select material0 under Assets on the bottom left-hand corner so you can see the various settings you can choose for material in the inspector on the right.

In the inspector for material0, click on the drop-down menu for “Shader Type” and choose Face Paint. Face Paint Shader will give you the most realistic look if you are adding face paint or tattoo design on the face. I chose Face Paint because it looks the best to me for this filter we are going to make.
Step 4: Add a texture to the material
Before we begin adding texture, I would need you to download a file I have prepared, which can generate a procedural texture for you in Spark AR HERE.

Import the file you downloaded by clicking “Add Asset” at the bottom left-hand corner, which you can select the file to import from where you saved it in your computer by clicking “Import From Computer”.

Next, click on view and select “Show/Hide Patch Editor”. Patch Editor is a type of visual programming where anyone without a programming background can easily set up the logic for the filter to work. Don’t worry, we are not going to do anything complicated for this article.

Drag the file (The actual name is ‘Patch’!) you imported just now into the patch editor, which now can be seen in your Spark AR. You can adjust the height of the Patch Editor by dragging it up & down if the size doesn’t suit you.

Click on material0 and go back to the inspector on the right. Click on the tiny arrow on the left side of the word “Texture”.

A tiny yellow bow will appear in your patch editor and that’s great!

Connect the two patches, by clicking on the output of the patch on the left (red above) and drag it to the input of the patch on the right (green above).
And there you have it! A finished animated face filter! You can change the colour of the face mesh to the colours you prefer and change the speed of the animation by change the value in the patch.
Step 5: Preview your effect

You can preview your effect on your phone by clicking on the little phone symbol on the bottom left-hand corner of Spark AR. Select send to App and choose Instagram Camera.

Wait for it to complete uploading the preview and you will receive a notification on your Instagram to preview your effect! Click on it and you can test your effect on Instagram itself!
Step 6: Save & Upload
You can save your file just like saving any file in other software such as MS words, click on “file” on the top left-hand corner and save your file to anywhere in your computer.
Before you upload your file, you also need to prepare an Icon for your effect. To save time, I have prepared one for you HERE. Feel free to use your own logo too, but take note there are some requirements for the Icon:
PNG or JPG file type
Maximum 1 MB file size
200 x 200 to 700 x 700 pixels (square)
No transparency for JPG files
Transparency turned on for PNG files

To upload your file, you can click on the upload symbol on the bottom left-hand corner of Spark AR. Spark AR will automatically open up your browser and lead you to SparkAR Hub where you can complete the uploading process!
After which, all you need to do is wait for the filter to be approved by Facebook, which can take up to 10 working days but usually shorter.
Final Step: Share your filter!
Once approved, you will be able to find your filter in your Instagram account by clicking on the smiley face in the middle.

Finally, you can share your filter on your Instagram stories and don’t forget to tag me @gowaaofficial so I can see your filter too!
Contact us at info@gowaaa.com to find out how you can make a filter for your brand on Instagram and Facebook! Or hangout with us if you are in Singapore too!


Spending time quarantined at home can actually be a great chance to reset and focus on things we usually put off. I have been using the extra time to read more, try new recipes, and plan future adventures. Researching destinations like Glacier National Park Tours gives me something exciting to look forward to once travel feels safe again. Staying productive and inspired makes the days pass a lot easier.